line up

line up
Showing posts with label sewing tricks. Show all posts

24 Jun 2013

Flower madness

What is wrong with the weather? Seriously?
Let me explain. For weeks I complained that the sun wouldn't show, hence I couldn't wear my beautiful dresses or trot around in shorts. Then the sun came and it was so warm outside that it was impossible to walk in the street because of the heat, let alone wear a dress.
And now it's cold again... I will complain to Germany's tourism office!

You can easily understand that if it's difficult to know what to wear, it's even more difficult to know what to sew. Gives me a headache. So, last week, while I was liquefying myself in the hot weather coming from the Sahara. Yes, you read right and during winter we have winds coming from Siberia :-), I made a crazy ensemble.

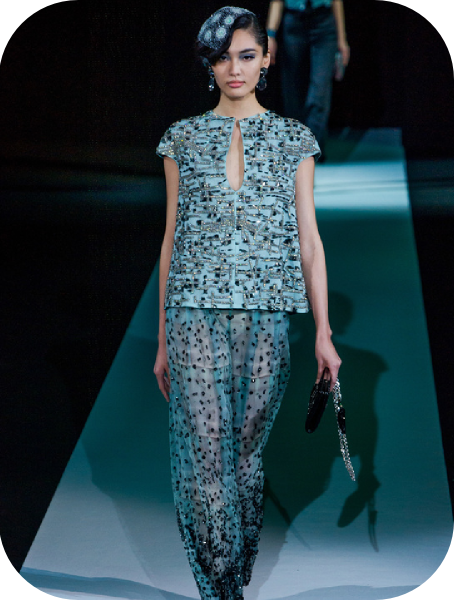
Inspiration came from Giorgio Armani:

And Tara Jarmon:


I wanted to have a super fashionable ensemble, that I could wear as well in the city as at the beach. Shorts are a basic in my summer wardrobe, I wear them more than dresses because I have very long holidays and walk and ride a lot during those, so I need something comfortable and breezy.
Here is what I came up with:

Look, flowers!
Pretty bold no? It's made with a light cotton print I bought before leaving France, 6 Euros for 1,50 cl, not bad hey? Pattern self drafted of course. I complained in this post that I had difficulties making simple shorts that fit well with the perfect length. Well this is it, I finally managed to make them!! I am so happy, love shorts! A round of applause for me!!


I made some fancy velted pockets. Two real at the front, and two fake at the back:
front

back
I had to scramble a little to find how to make the front pocket's "bag". This is how I made it, basically just by playing with my lining. It turned out fine, and it didn't take too much time to make.


 See, on the first picture, I placed my lining above the opening, pined it and cut the fabric around. Just living enough to stitch them together. Then I put my second piece of lining and a piece of my flower fabric just where to pocket opens, stitched and voilà:

 
I didn't bother to make real pockets for the back, it's just for show:


From Giorgio Armani, I took the idea of the "goutte d'eau" opening. It's a nice detail, and it was not hard to do, it just needs a good press to lay flat on the torso. Maybe I could have made it bigger. But I don't like to touch the shape of a garment when it's already stitched, if it fits right, I just follow my pattern, point.


Made some self bias for the neck line, love it, It's clean and very practical. I could have used it for the opening but I don't like to put too much stuff on my pieces so instead I used facings:


And I stitched by hand around the opening, basting the facings inside only.
The top is closed by a lovely vintage button that I used in this previous garment.

And the shorts are closed with buttons because although I bought a bunch of zippers last time I went to the city, I didn't have one with the right color or length, and because I'm crazy lazy, I just did with what I had, which is buttons...


I would have never wear such a crazy ensemble a few years ago, but prints are growing on me, clearly. I think it's super fashionable and totally appropriate for my way of live now. Just not for the weather, on the pictures it's already more than 25°c (77°f) and it's not ten o'clock yet.


My only concern now is the weather. Maybe I should make myself a rain coat and some long sleeved T-shirts. It seems more appropriate for the kind of weather we are currently experiencing. Sad, I just want to make bathing suits and dresses and more shorts and cute tops. This is why a women's got a have an extensive wardrobe! Because you never know what kind of weather you're going to have and clearly, I am not going to wear plaid in June, even if it's cold!!


I also made a pair of white ones, just because. I am now making a super bright top to go with the shorts, and I plan on making bikinis! BIKINIS!!! Give me some sun!! Lots of it !!

Cheers everyone.

26 Feb 2013

Phase two: Robin Scherbatsky's pleated shirt


Remember my pants? I  realized while making them, that I absolutely needed a nice shirt to go with it, yes, absolutely! As a French women, I have a lack of black clothes, this is clearly an issue that needs mending.
For some time now, Robin in How I met you mother, really has the perfect shirt wardrobe! They are so beautiful, both shape and fabric. Although it really is a bad example for a clothe lover like me. Don't you think the amount of clothes the actors get to wear is crazy? This is the kind of stuff that distracts me from the story because honestly, who has so many outfits? And where does she find the money to buy all this crazy expensive silk shirts? Truly? She should give them to me :-) 

 The firs time I saw this shirt I knew I had to make it. I found the original on shopbop.com. I like to have a good idea of the original shirt. I makes it easier to make the pattern. When making a copy of some clothe I have seen I don't have any rule. Sometimes I make an exact replica (or so I think...), sometimes I just make a pattern with the fitures I find interesting.


 I had a nice viscose piece of fabric waiting to be sewn. I bought it before moving to Germany, it was just 15€ for 3 meters, which in my book is a bargain I just can't pass!
Making a pattern for a pleated clothe requires special techniques. I like very "clean", simple shirts, this is why I always pay great attention to the dart's position. 
In this case, they are hidden underneath a pleat. To do so I  had to move both bust and waist darts from their original position to form a straight line underneath the pleat.

Ajouter une légende


The picture on the left is my basic pattern. See the red dot? This is the bust point, ans the red line is the line where I can make the last pleat. The pleats are to be made between the two dart points.
I cannot have any dart underneath the pleated section, so I moved the  width of the darts to the left and traced as many pleats as I wanted, in this case 4 on each side of the middle line.

Pleats on a fitted or semi fitted shirt can't got any further than the bust point. The reason is obvious, try to do it with a piece of paper, and you will see that it's impossible to form them on a curve.

This is why some designers only use very flat chested women, if you don't really need to have darts to have a good fit, then you can make crazy patterns with pleats and you name it craziness, that are IMPOSSIBLE to recreate for the busty ladies!

I looked at the back of the original on Internet, I didn't really like it but kept it's upper part.


I wanted something a bit interesting, so I thougt I would make open darts, it gives shape and is not too boring like normal stitched darts. The red line on the upper piece is the shoulder line, I moved it a few centimeters, I think I could have added a few more. You live and learn.

The front part was a bit trickier. It takes some time to prepare the pleats. You have to report the marks with chalk, then tailor's tacks,


 then fold, stitch the pleats so that they won't open (that I had forgotten :-)),


see what happens when you don't close your pleats... It opens.


and finally iron them with some cardboard to prevent the fabric from marking. Ouf, that is precise work, but it's worth it.


The original also has as a small opening on the front part, it's very pretty. 


Basically you take a piece of fabric longer than your opening, then stitch around on the right side of fabric, open it with you scissors. With your iron fold the piece of fabric on the wrong side et voilà! You can stitch around the opening on the right side to assure it won't move, it can be pretty nice with fancy embroideries, but I didn't do it. I'm not much of a top stitching person!

Anyone interested by pictures of my sleeves?
  

 Ok, so, more preparation, notches, slashes. Actually, had I stitched them correctly, it would have  been a nice ride. 
But I forgot that I had changed the shoulder seam. And didn't make a mark on the fabric so I attached the top of the sleeve to much on the front of the shirt.  Good old seam reaper was called to the rescue!
Fortunately, I did good with the cuff, the hardest part is to stitch that little opening without making any unintended pleats, i think it can be easy or hard depending on your fabric. This one was nice to me:


Can you see on the first picture, I stitched around the little opening to make it stronger. Then I used a bias tape (not made on the bias, no need). Stitched it to the right side, a bit of ironing to fold it on the wrong side, then attached it by sewing just on the edge, this is why the second fold as to be a bit bigger than the first one.
And a few hours later: tada! 


Well, black is maybe not the best color in picture to see the details...
Close-up?


The lovely buttons are vintage, I bought them in a small haberdashery on the island of Groix in Brittany. There notions are all vintage, coming from an old store who closed maybe 20 years ago! I made a little holdup there before living, although it's really not easy buying notions when you don't know what you are going to use them for.


My photografer seems to have a thing for blurry pictures, what can you do? Anyway I'm very pleased by the shirt it's exaclty like I wanted it, I even did the sort of belt on the front of the shirt, nothing fancy, just a rectangular made with small stitches. I just need to shorten the cuffs, I have really tiny wrists. Better not say too much, this will be part of my next post...

conclusion: happy!! and blurry.

12 Feb 2013

Phase one : the pants

Dear all, there is a first time for everything, so, for the first time ever, my pants on the internet !


They are straight, more classic you die ! The fabric is a nice piece of wool that holds really well. I have know been wearing those for a couple of hours, and they don't stretch or do anything unexpected, which is nice !