line up

line up

24 Jun 2013

Flower madness

What is wrong with the weather? Seriously?
Let me explain. For weeks I complained that the sun wouldn't show, hence I couldn't wear my beautiful dresses or trot around in shorts. Then the sun came and it was so warm outside that it was impossible to walk in the street because of the heat, let alone wear a dress.
And now it's cold again... I will complain to Germany's tourism office!

You can easily understand that if it's difficult to know what to wear, it's even more difficult to know what to sew. Gives me a headache. So, last week, while I was liquefying myself in the hot weather coming from the Sahara. Yes, you read right and during winter we have winds coming from Siberia :-), I made a crazy ensemble.

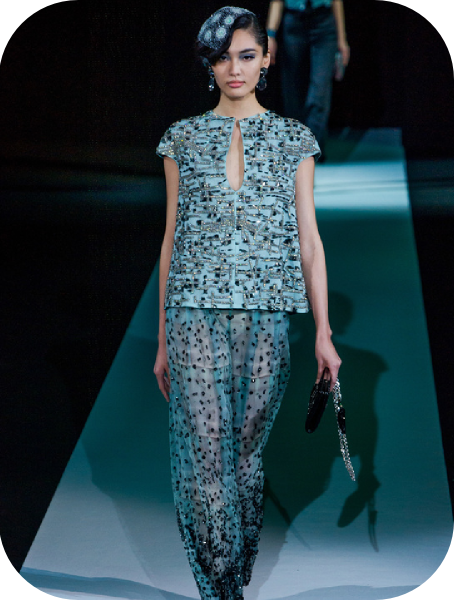
Inspiration came from Giorgio Armani:


And Tara Jarmon:


I wanted to have a super fashionable ensemble, that I could wear as well in the city as at the beach. Shorts are a basic in my summer wardrobe, I wear them more than dresses because I have very long holidays and walk and ride a lot during those, so I need something comfortable and breezy.
Here is what I came up with:

Look, flowers!
Pretty bold no? It's made with a light cotton print I bought before leaving France, 6 Euros for 1,50 cl, not bad hey? Pattern self drafted of course. I complained in this post that I had difficulties making simple shorts that fit well with the perfect length. Well this is it, I finally managed to make them!! I am so happy, love shorts! A round of applause for me!!


I made some fancy velted pockets. Two real at the front, and two fake at the back:
front

back
I had to scramble a little to find how to make the front pocket's "bag". This is how I made it, basically just by playing with my lining. It turned out fine, and it didn't take too much time to make.


 See, on the first picture, I placed my lining above the opening, pined it and cut the fabric around. Just living enough to stitch them together. Then I put my second piece of lining and a piece of my flower fabric just where to pocket opens, stitched and voilà:

 
I didn't bother to make real pockets for the back, it's just for show:


From Giorgio Armani, I took the idea of the "goutte d'eau" opening. It's a nice detail, and it was not hard to do, it just needs a good press to lay flat on the torso. Maybe I could have made it bigger. But I don't like to touch the shape of a garment when it's already stitched, if it fits right, I just follow my pattern, point.


Made some self bias for the neck line, love it, It's clean and very practical. I could have used it for the opening but I don't like to put too much stuff on my pieces so instead I used facings:


And I stitched by hand around the opening, basting the facings inside only.
The top is closed by a lovely vintage button that I used in this previous garment.

And the shorts are closed with buttons because although I bought a bunch of zippers last time I went to the city, I didn't have one with the right color or length, and because I'm crazy lazy, I just did with what I had, which is buttons...


I would have never wear such a crazy ensemble a few years ago, but prints are growing on me, clearly. I think it's super fashionable and totally appropriate for my way of live now. Just not for the weather, on the pictures it's already more than 25°c (77°f) and it's not ten o'clock yet.


My only concern now is the weather. Maybe I should make myself a rain coat and some long sleeved T-shirts. It seems more appropriate for the kind of weather we are currently experiencing. Sad, I just want to make bathing suits and dresses and more shorts and cute tops. This is why a women's got a have an extensive wardrobe! Because you never know what kind of weather you're going to have and clearly, I am not going to wear plaid in June, even if it's cold!!


I also made a pair of white ones, just because. I am now making a super bright top to go with the shorts, and I plan on making bikinis! BIKINIS!!! Give me some sun!! Lots of it !!

Cheers everyone.

14 Jun 2013

Grandma shorts and Peplum top

I have a problem with shorts.
It's not fare. I do love shorts, it's almost all I wear during summer. So why can't I get the fit right? Let me show you:


This is my inspiration. An elegant short with pleats and pockets, I love pockets. The only change I had to make was the length. I very often have to go through the University, and it seems that the students find my shorts a bit, well short! Hence the staring. I don't really mind, but, I thought that maybe I could wear something that shouted less beach and more city.
So I made my shorts longer and it turned out like that:


If I hear one of you laugh... They are horrible!! Actually the fit is great, very comfy, but the length, the length, berk!

So, off to the sewing machine. I've shortened them and made an adorable top to go with them:


Much better no? The shorts are still a bit too long for my taste, but the top is perfect.
Can you believe I don't own any peplum? It seems that everyone who loves clothes and fashion has one.
I made it with a marvellous Liberty cotton print.


I love Liberty fabrics. They are a bit pricey compared to what I usually buy, but La droguerie in Rennes has a huge collection and proposes little bits of fabric, 70 x 150 cm, that I can hardly resit to.
I had to line it. I had in my stash some very light cotton in a bright pinkish orange:

I should remember to buy some more. I was so happy with myself for buying it! It definitely a good thing to have a basic stash of lining, thread and zippers when you live a bit far from your favourite fabric store. Caroline of Diary of a sewing fanatic who is an amazing sewist, has the biggest stash ever, and she is so right. When she wants to make something, she can, because she already has everything home. you can read all about her planning here.

As usual I made all the patterns for this outfit (I'm pretty sure no one wants my shorts pattern :-). There are a few options for the peplum part. It can be pleated, gathered, flounced. Ouf, that's a lot of options,witch is great, it means you can choose whatever style you prefer.

I chose to make it simple, no pleats, because of the loud print of my fabric.
The pattern is quick to make:

 First I cut my pattern at the waist to create the peplum.

 Then I divided it in three parts, creating two new darts, and allocated the width of the original dart between the three new ones (there are 2 in the middle, and one on the right side).

 Then I cut the pattern.

Closed the darts, and prolonged in a straight line the left side of panel 1.


There it is, the peplum. It is also the base for a moderately flouncy skirt, you just have to prolong your  middle front and side to the length of your choice.


Isn't this lining pretty? You can see in this picture the two darts on the front bodice. It's the first time I do that. It really gives a good fit, very tight, I like it.

 
I was concerned with how this would turn out after I wash it. I thought maybe I should do something to help me with the ironing. You know, so that the lining would stay in place and that I would not have to fight with it so that it would not peek on the outside. So while watching The Borgias, I hand picked around the neckline and armholes. But just on the inside. I don't like it when too much is happening on a garment.


I used a clever technique to sew by machine my lining to my the rest of the garment, I am very proud of it, it's really clean. Look, admire! 


I'll explain it to you later. Come on, my holidays are coming, I don't have so much time left to made me an awesome wardrobe for this summer!!


Lapped zipper. Because, I don't know. I don't have the right foot for an invisible zipper. And every body seems to make those, so, why not hey? It's nice. I'm such a copy cat. Just a very very late one :-)


My photographer seems to finally have mastered the non blurry pictures, next step, taking more!! Who does he think I am? Kate Moss? I need a tone of pictures taken to have one where I stand straight, smile and most important where you can see the clothes!!

 Haa, straighten me this top!!

flounce baby baby, flounce!

joli !!

So far, I have not had many occasions to wear those. But I believe that when I'll go back to work this peplum will make many appearances, with a nice straight skirt or some very tight white pants. And for the shorts, well, a good five centimetres less and they will look exactly like those Alberta Ferretti ones. I guess that the students at the university will have to bare with their not very clothed neighbour! Na, who cares? Long shorts sucks!!

Salut!

Next, some more short shorts and print and maybe some sun, maybe...

3 Jun 2013

A summer basic and a little pattern making explanation

Hello,

finally, a day of almost nice weather! I mean, I thought time was going backwards and winter was there again. No! I don't want to shovel any more snow!!

I have been sewing summer clothes for a few weeks now and haven't been able to wear any of my new outfits. Rain, rain, and some more rain, made even impossible to take pictures inside because of the lack of light. I'm telling you, depression was right around the corner.
You can imagine how delighted I was Sunday when finally I could wear my new bermuda. I don't know how it's called in English.


It's a very preppy look, in French some people would certainly call it BCBG.  I just find that practical. Those very long rainy days allowed me to think about what I really wear in summer. And let's be honest here, Brittany is a great place for holidays, but you never know what the weather is going to be. So I chose to make a piece I am sure to wear.

I made it with the big piece of fabric I bought at the Stoffmarkt Holland market.
It's cotton. I think. I don't know if I red the label, and even if I did it was certainly written in German, and you know the state of my German. It's shameful.


The fabric is very soft on the inside, love it. But has no stretch. This is why I made the pattern with a straight pant pattern, slightly narrow at the knee. I want to be able to ride my bike with it.

As usual I made Italian pockets at the front.


Can you see me holding my tummy in on this one? 

The pocket on the back is a fake one. According to my book, it's a flap under a velt. Correct translation anyone? 

 It looks like a real one...

but it's not! Can you see where the pocket stops, just above my thumb?
I do that sometime, because I don't use my back pockets, and my pants are usually very, very tightly fitted on my butt. So there's no place for a real pocket there, and when I make one, usually you can see it through the fabric. I don't find that particulary nice looking.

I used a very rigid interfacing for the belt. A vliseline H250 for the French readers. I worked wonderfully, I think it's the most beautiful belt I have ever made. It holds superbly, no wrinkles. I have to admit that last time I made a belt, I had to remove all the finishing stitches and stitch it again because it was crap, so this time I payed attention.

See, no place for a pocket here!


But why is she dancing in the garden, pretending it's warm?
Because I also made a T-shirt! I love it.
Of course, the fabric was also bought at this famous market. I tried something new, well two new things. One worked, and the other, well, you can almost see it.

First construction. 
Lining the strips before cutting
 It is out of question that my stripes are not matching, it's a big no no.

And then preparing the different parts of the pattern to match.


I mark on the pattern where the stripes are. Then I put the front and back pieces of the pattern on top of each other and report my marks on the other pattern pieces. This way I make sure that when I stitch the pieces together the stripes line up.


So what is new about this T-shirt? 
It has sleeves, but they are fake kimono ones. I love it. I just lowered the armhole of 5 cm and at 2,5 cm from that point to the side traced a curve for the under arm. Then prolonged the shoulder by I think 10 cm and traced a perpendicular line to join the under arm curve.
Then I tried, to make a cowl neckline. But I think I didn't make the collar wide enough. Scratch that. IT IS NOT WIDE ENOUGH!!
But it's there see:

And there, can you see it at the collar? What are you saying? You need a magnifying glass to see it? Can't you see the sort of drape at the front ?


Anyway, I have made a drawing of how to make the pattern of a cowl neckline:


Take your basic pattern. Choose where the neckline begins at the shoulder and on the middle front line, then trace a perpendicular line beginning at the middle front and stop it a few centimetres away. This is where I made my mistake. I didn't trace this line far away enough from the middle front. The longer this line is, the more draped is your neckline. Then trace your new middle front beginning at the hip line and joining the lower part of your neckline.
Easy enough, but if you want a very draped top, then you won't be able to have a fitted garment.
And depending on where you start your "décolleté" you may have to shift your bust dart.

That's all for today. I am actually working on the cutest top. I hope the weather is going to be warm enough so that I can wear it (witch is the purpose of my sewing :-), and most important take pictures!!
Oh, I tried to have some non blurry pictures this time. It's getting better, but there is still a long way to go. Ah, men...

see you soon.