line up

line up
Showing posts with label pattern making. Show all posts

10 Mar 2016

Drafting a sports bra pattern

Sports bra!


yes, I am currently trying to get some muscles into that body, and guess what, it's a great opportunity to sew! Because apparently now when I see something I like in a shop, the first thing that comes to my mind is :" I could so make that", not:"I am going to buy that". It seems I really don't want to make my life easy. 
So there you go, I made a sports bra, and you know what? It was super fun!

Obviously I went a little crazy with my fabric, but I will say that every time I put it on, it makes me smile. So, yes, I am saying it: "I love leopard prints!!".
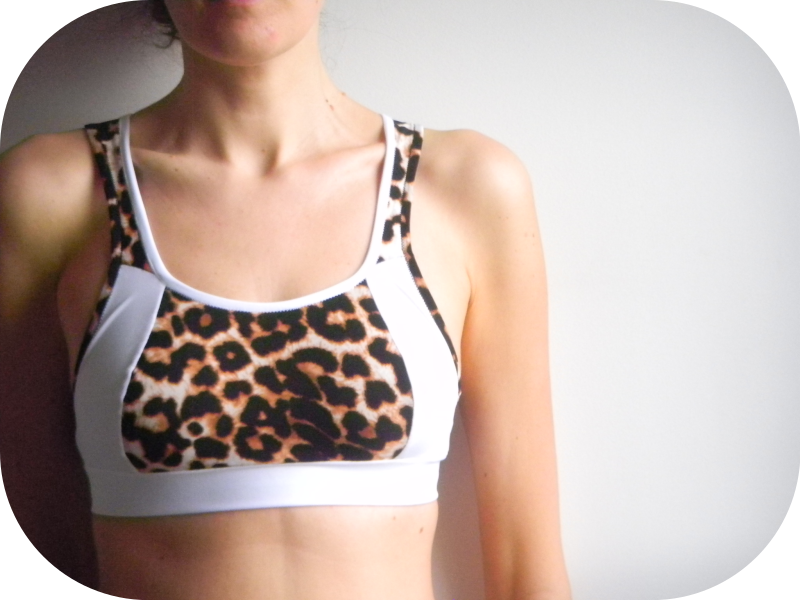
I searched for a polyester fabric with approximately 10% elasthanne. I just checked on a sports gear catalogue, and this is the percentage used in all bra sports, so there you go.
The white fabric was in my stash. I use it for underwear or swimwear, it's quite sturdy and firm with a good recovery.


At first, I thought using just an elastic for the straps would be enough, but ah no. I was soo wrong. There was no support at all. So I had to design something strong enough to keep everything in place. And this is what I came up with.


  Blurry picture anyone?
 My pattern was designed for a small elastic strap. I was so lucky that I got to correct my mistake.
I have used the bra a few time now, and it's good, it's really good.  It makes me happy because when I had the idea to make a sports bra, of course I wanted to wear it immediately, but it took me a few hours to make the block pattern, then to create the pattern for my project, and then to create the straps.
Haaaaa, I was frustrated.
Really.
But then sewing it was quite quick, and easy. And finally when I got to try it and it fitted good and it looked nice, I was so pleased. Now I can make as much as I need!


Here is how I drafted my pattern:

http://www.esmod-editions.com/
I used ESMOD's method for underwear pattern drafting. I can't say that I love their method for drafting panties, but the bra part is good.


As usual with the flat pattern technique you take your basic pattern. In these case the basic bra.
I have put all my pieces on one sheet of paper and put it under plastic for frequent use.

Then I use tracing paper to copy the base in order to modify it.


The book explains how to make a real sports bra. By this I mean a bra with two cups, similar to a "normal" bra, but without underwires.

This is not really what I wanted to make. But I still traced the pieces, and then assembled them in a manner I thought would be suitable for what in French we call a "brassière". I think in English it could be translated in: bralette. For inspiration I took a look at the selection at Forever 21 and they call them sports bra, so, OK, there is maybe no special word for it.


This is what my basic pattern looks like. I really followed the instructions of the book, the only thing I changed is the width of the band. I enlarged it to accommodate a 3 cm (1,18") elastic.
 

Then I took this basic sports bra pattern and modified it. Above is my final pattern. two pieces for the breast, and a band for the elastic. My problem was then do draft the back.


I hope you can see clearly on this pictures. I used my Esmod bust block pattern. And tried to place my bra pieces as best I could, so that I could draw any shape of back, straps, front neckline, and  still have a good fit in relation to a sports bra. It has been really helpful.


Preparation takes time, and it got me frustrated, but I shouldn't have been. It's really useful, and now I can use it again to draft very rapidly any sports bra I dream of.

In this picture you can see that my pattern piece on top has little folds.
This is a crucial step when you design with stretch fabrics that will be stretched during use. You have to shrink them by the percentage of stretch in you fabric.
It's a bit of a pain, but héhé, no pain no gain.


Here you can see the three pieces of the back.
The fabric don't have the same "hand", so the shrinkage is different.

I really enjoy making my own patterns, and if this is something you would like to do then go for it!
It's fun, it makes you think, your clothes are really made to your measures and it fits perfectly.
Of course it's quite a time investment, What I try to do is to build a stock of basic patterns, that can be modified easily and quickly. I am getting there. And I feel so proud to be able to wear clothes entirely made by me, and it's really fun sometimes to copy designers clothes for a tenth of what they cost in stores!


Finally here are some inside pics, because we all love that! Sewing porn right?
I lined everything with mesh. I thought it would give more support. The raw edges were finished with a simple binding. There are lots of methods to do this. You can check out Megan's way. Then I simply top stitched with a zigzag. I can't believe a few years back, I would have never used a zigzag because I wanted a clean look with no visible stitches. What was I thinking? Top stitching is fun, I don't know why but it is, and top stitching with a zigzag is double fun!


That's it. I hope I am beginning to tempt you to try to make your own patterns. If I can do it, anybody can!
Buy pattern making books and join me! I really wish to share my experience and maybe help or inspire some of you into making beautiful, made to measure clothes. Any kind of clothes you can think of!

This sports bra was just a first attempt. Next time I will change the pattern a little, I already have ideas.
Soon I will explain how to make your own panties. It's really easy. And this time no need to buy any book.


Cheers!

14 Oct 2013

DIY: a fake bow

Bonjour tout le monde !

Today I have decided to share with you a little tutorial on how to add a cute bow to your garment.
I have a trip planned ahead, and of course I need new clothes. I had a nice stretch wool in my stash and some viscose. Those fabrics are comfortable and make a nice ensemble for a diner out after a day visiting.


Actually the pants are a copy of an old favourite from ZARA. I was able to find almost the same fabric, but in another colour of course!
For the pictures I wore heels, but until I get back to work I will wear my pants with flats more probably, it's why the pants appear a bit too short in the pictures. Didn't realise that before...

Man, the weather was really crappy for taking pictures, sorry!

Let's get to the bow now:

This is a nice feature, romantic and most important: it's fun to make!
I also made bows on my sleeves, so cute!


See why I call them fake bows? It's technically a dart.

As usual you need to take your basic pattern.

For my top I decided to move the bust dart to the side. For that, trace on your pattern the new bust dart (in red). Close the "old" dart  by folding the line on top of one another and pin them in place.
Then slash the new dart.

Draw your bow, slash those darts open. Then the tricky part: you have to decide the depf of your darts, mine are 4 cm wide. It's just a question of taste, there is no way of knowing how many centimetres you need. You can play around with you fabric to estimate the final look of you bow.
When you have decided of the size of your darts take a piece of paper to tape under to maintain your darts in position, like below.


This is my final paper pattern. I used a ruler to  show you that your center front should be placed en the fold. Mark precisely your darts and then stitch the sort of V created buy the creation of your darts. Do you follow?


Then to create the illusion of a bow, take a small piece of fabric that you have prepared before ( fold it in 2, stitch the big side, turn it around). Then place it in the crease of one of the darts (above). Fold your dart, stitch it (blue line). Repeat on your second dart.

 Then you should stitch buy and on three centimetres your darts so that you bust dart isn’t too low. It happened to me, I was quite surprised because I thought my pattern was perfect.


There you go, you should have a nice and fake bow!!


Picture of the inside because I know you love it, I know I do.


 I used self made bias to finish the collar and sleeves. Stitched the first side with my machine and the second by hand so that it would be invisible.
The rest of the seams are French seams because the fabric is rather light, and I find it give a nice finish.


Oh and look, it even goes with my Chanel jacket that I made a few months ago, isn't it perfect? what you don't see my top, well yeah! It's the point, it goes perfectly with it's neck line.


This is what is really cool when you are drawn to certain colour, you find yourself having a real wardrobe with pieces that go well together (or a least I hope they go well together :-)).


That's all for today. See you in few weeks, when I get back from my trip.

Cheers!

14 Jun 2013

Grandma shorts and Peplum top

I have a problem with shorts.
It's not fare. I do love shorts, it's almost all I wear during summer. So why can't I get the fit right? Let me show you:


This is my inspiration. An elegant short with pleats and pockets, I love pockets. The only change I had to make was the length. I very often have to go through the University, and it seems that the students find my shorts a bit, well short! Hence the staring. I don't really mind, but, I thought that maybe I could wear something that shouted less beach and more city.
So I made my shorts longer and it turned out like that:


If I hear one of you laugh... They are horrible!! Actually the fit is great, very comfy, but the length, the length, berk!

So, off to the sewing machine. I've shortened them and made an adorable top to go with them:


Much better no? The shorts are still a bit too long for my taste, but the top is perfect.
Can you believe I don't own any peplum? It seems that everyone who loves clothes and fashion has one.
I made it with a marvellous Liberty cotton print.


I love Liberty fabrics. They are a bit pricey compared to what I usually buy, but La droguerie in Rennes has a huge collection and proposes little bits of fabric, 70 x 150 cm, that I can hardly resit to.
I had to line it. I had in my stash some very light cotton in a bright pinkish orange:

I should remember to buy some more. I was so happy with myself for buying it! It definitely a good thing to have a basic stash of lining, thread and zippers when you live a bit far from your favourite fabric store. Caroline of Diary of a sewing fanatic who is an amazing sewist, has the biggest stash ever, and she is so right. When she wants to make something, she can, because she already has everything home. you can read all about her planning here.

As usual I made all the patterns for this outfit (I'm pretty sure no one wants my shorts pattern :-). There are a few options for the peplum part. It can be pleated, gathered, flounced. Ouf, that's a lot of options,witch is great, it means you can choose whatever style you prefer.

I chose to make it simple, no pleats, because of the loud print of my fabric.
The pattern is quick to make:

 First I cut my pattern at the waist to create the peplum.

 Then I divided it in three parts, creating two new darts, and allocated the width of the original dart between the three new ones (there are 2 in the middle, and one on the right side).

 Then I cut the pattern.

Closed the darts, and prolonged in a straight line the left side of panel 1.


There it is, the peplum. It is also the base for a moderately flouncy skirt, you just have to prolong your  middle front and side to the length of your choice.


Isn't this lining pretty? You can see in this picture the two darts on the front bodice. It's the first time I do that. It really gives a good fit, very tight, I like it.

 
I was concerned with how this would turn out after I wash it. I thought maybe I should do something to help me with the ironing. You know, so that the lining would stay in place and that I would not have to fight with it so that it would not peek on the outside. So while watching The Borgias, I hand picked around the neckline and armholes. But just on the inside. I don't like it when too much is happening on a garment.


I used a clever technique to sew by machine my lining to my the rest of the garment, I am very proud of it, it's really clean. Look, admire! 


I'll explain it to you later. Come on, my holidays are coming, I don't have so much time left to made me an awesome wardrobe for this summer!!


Lapped zipper. Because, I don't know. I don't have the right foot for an invisible zipper. And every body seems to make those, so, why not hey? It's nice. I'm such a copy cat. Just a very very late one :-)


My photographer seems to finally have mastered the non blurry pictures, next step, taking more!! Who does he think I am? Kate Moss? I need a tone of pictures taken to have one where I stand straight, smile and most important where you can see the clothes!!

 Haa, straighten me this top!!

flounce baby baby, flounce!

joli !!

So far, I have not had many occasions to wear those. But I believe that when I'll go back to work this peplum will make many appearances, with a nice straight skirt or some very tight white pants. And for the shorts, well, a good five centimetres less and they will look exactly like those Alberta Ferretti ones. I guess that the students at the university will have to bare with their not very clothed neighbour! Na, who cares? Long shorts sucks!!

Salut!

Next, some more short shorts and print and maybe some sun, maybe...